

HubSpot App: Send, Sign and Manage Documents from within HubSpot.
Request Signatures and Manage Documents from HubSpot Companies or Contacts
Prerequisites:
In order to install and setup the SnapSign for HubSpot application, you will need a valid SnapSign account – this can be our free no-obligation trial or a pre-existing paid subscription. If you do not have a SnapSign account setup, you can click here to sign up for the subscription that best meets your requirements – www.gosnapsign.com/#Pricing
IMPORTANT:
When installing SnapSign for HubSpot, please note the following two requirements:
1). The HubSpot user that you are logged in as must be an Administrator in HubSpot
2). The email address of the HubSpot user that you are logged in as when you are installing SnapSign for HubSpot must also have a valid SnapSign account with the same email address.
The above are required in order to properly install SnapSign for HubSpot.
Installing SnapSign for HubSpot
In order to get started, we will have to connect HubSpot with SnapSign. To do this, log in to HubSpot and navigate the Integrations page. Once there, click on the Connect An App button. This will open the Browse and Connect Apps page. On this page, type ‘SnapSign’ in the Search Integrations search box and then click on the magnifying glass button.
You should see the SnapSign app card. Move your mouse over the SnapSign app card and click on the View Integration link. This will open the Install SnapSign for HubSpot page. Click on the Connect to SnapSign button.
This will open a SnapSign HubSpot Integration Successful landing page.
That’s it! You have just connect HubSpot with SnapSign.
Map HubSpot Record Property Values to SnapSign Field Tags
Now that you have linked HubSpot and SnapSign, you can map HubSpot record property values to SnapSign field tags. By mapping the HubSpot property value to SnapSign, you will be able to automatically populate SnapSign documents and templates with HubSpot data, eliminating the need for manual data entry.
In order to do this, login to SnapSign and navigate to the document or template that you would like to prepopulate with HubSpot data. Once there, click on the SnapSign field tag that you want to populate with HubSpot data. This will open the field tag’s menu. Next, click on the field tag’s Advanced Features link and scroll down to find the Default Value field.
In the Default Value field, you will need to enter the following in order for SnapSign to populate its field tag with the HubSpot field value: Default Value example #property(<HubSpot Property Internal Name>)
Finding HubSpot Property Internal Name
In order to map HubSpot property value to a SnapSign field tag, you must know the HubSpot property’s Internal Name. To find this, login to HubSpot and navigate to the record that contains the field value you are looking to map to SnapSign. In the example below, we have navigated to the Deal record in HubSpot.
On the record page, click on the View All Properties button, this will open the Manage Properties page.
On the Manage Properties page, click on the Manage Properties button, this will open the Settings page. Then find the record property that contains the value you are looking to map to SnapSign. When you find it, click on its’ Edit button.
This will open the Edit Property page. On this page, click on the Code icon next to the property name field. This will display the property’s Internal Name that you can use to map the property value.
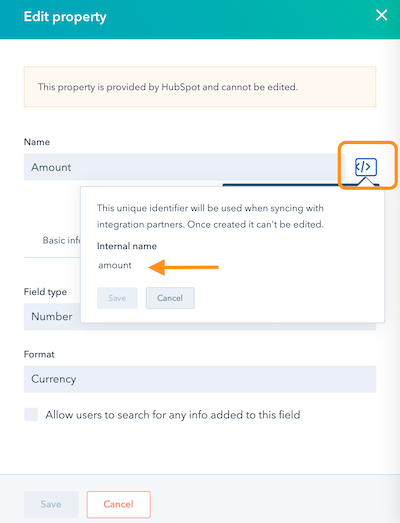
So for example to map to the Amount property on the HubSpot Deal record to a SnapSign field tag, you would enter #property(amount) in the Default Value field on the appropriate SnapSign field tag. This will return the value of the associated HubSpot Deal record’s amount property value.

Great! Get out there and get signing.
IMPORTANT: The HubSpot Field ID parameter that is passed to the #property() API for the purposes of data mapping IS CASE SENSITIVE and therefore must exactly match the HubSpot Field ID otherwise no data will be returned.
IMPORTANT: The fields mapped to a SnapSign field must be associated with the HubSpot record that the SnapSign button is deployed to. Once you have set the default values of the SnapSign fields, your document participants will see the HubSpot field values populated on their documents the next time you send them out.
New Signature Request
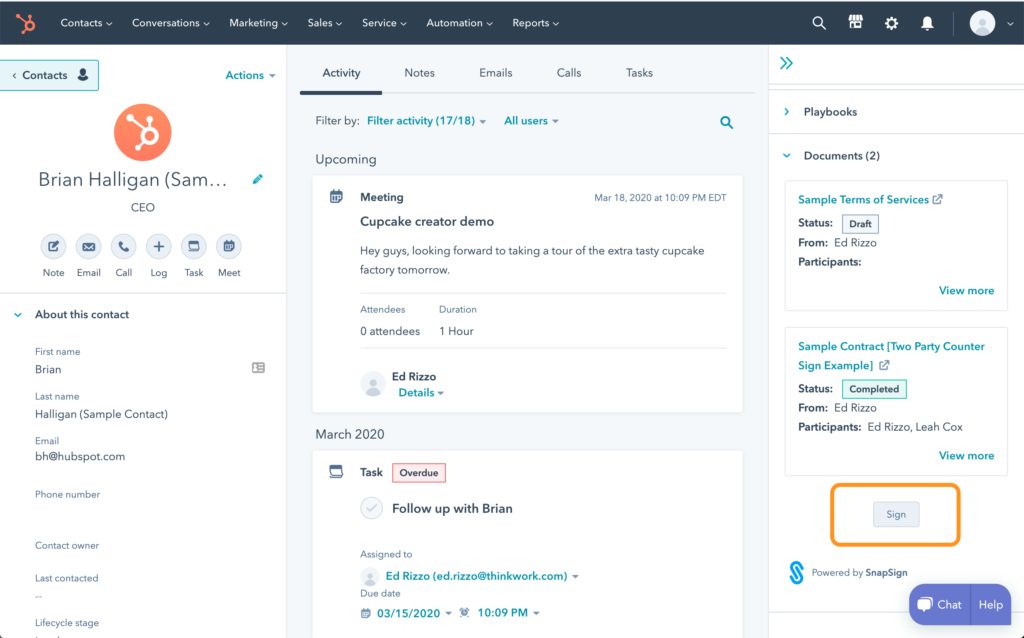
To initiate a new signature request from HubSpot, first navigate to the HubSpot record that you want to initiate the signature request from. Then on that page, find the SnapSign card and click on the Sign button.
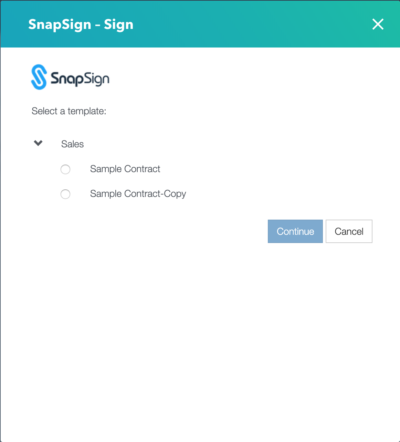
You will then be prompted to select whether you want to use a pre-built template as the starting point for your document or whether you want to create a new document all together.
Use a Template
If you click on Select a Template, then this will open the SnapSign Template page where you can select a SnapSign template to use to initiate your signature request. On this page you can select the template that you would like to use and then click Continue.
This will launch SnapSign in a tab with the template loaded. Now you can assign your participants and click Send to send out the signature request.
IMPORTANT: Please make sure that you allow pop-ups for gosnapsign.com. If you have a pop-up blocker on, the SnapSign tab will fail to launch.
IMPORTANT: If this is your first time clicking on the Sign button, you will be prompted to enter your SnapSign account credentials (username and password). Once you enter your SnapSign username and password, you can click on the Login button, this will close the SnapSign credential prompt and return you to the HubSpot record. Now you can click on the Sign button to initiate the signature request process.
View Document
If you would like to see a document that you have sent from HupSpot, you can click on the document name in the SnapSign card. Clicking on the document name will open the document in SnapSign in a new tab or new browser window.
Check Document Status
Once you have sent out a SnapSign document from HubSpot, you can check the status of a document at any time right from within Hubspot. To do this, navigate to the HubSpot record associated with the document. Once there, find the SnapSign card.
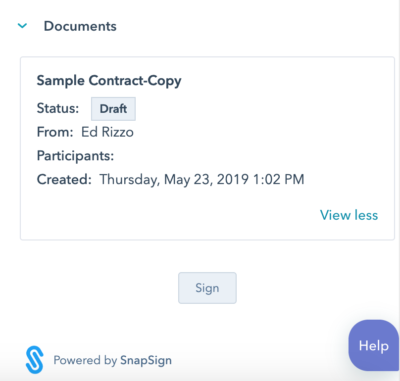
The SnapSign card will display the 5 ‘most recent’ documents that have been initiated from the HubSpot record. To view more information about a particular document, you can click on the View More link at the bottom of a document. This will expand the card to display some additional document information.
NOTE: If you have sent more than 5 documents, you can click on the View More link at the bottom of the SnapSign card. This will launch SnapSign in a new tab and you can navigate to
Troubleshooting
Received an error when trying to connect:
If you click on the Connect to SnapSign button and instead of seeing the SnapSign HubSpot Integration Successful landing page, you see the SnapSign HubSpot Integration error page, then you should make a note of the specific error that is presented on the page and contact your SnapSign administrator.
Received an integration incomplete warning when trying to connect:
If you click on the Connect to SnapSign button and instead of seeing the SnapSign HubSpot Integration Successful landing page, you see the SnapSign HubSpot warning incomplete integration page, this is telling you that the HubSpot integration has been added to SnapSign but because your SnapSign user account does not have sufficient privileges, the integration has not been activated. In order to finalize the integration it must be activated from SnapSign. To do this, log in to SnapSign with administrator privileges and navigate to the Integrations page (Profile Menu > Integrations > Third Party). This will open the Integrations page, click on the Edit action menu item for the HubSpot integration. This will open the HubSpot Integration page. On this page, click on the Active checkbox and ensure that it is checked. Then click the Save button. You HubSpot integration should now be active and available.
Getting started with SnapSign for HubSpot
Once SnapSign for HubSpot has been installed, there will be a new SnapSign card added to the HubSpot records that you have specified (i.e. Contact, Companies or Deals).